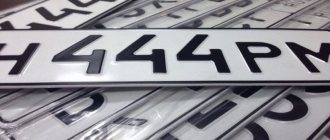
License plate illumination, which is a mandatory attribute of cars, often raises questions among drivers related to possible changes or upgrades in its installation. So, according to GOST, you need to stick to illuminating the license plate of the rear of the car, while avoiding illuminating the front number.
License plate illumination is a mandatory attribute of cars
If the light above the car’s “mini-passport” does not light up, or the lighting does not meet the standards, the driver of the vehicle, when traffic police inspectors discover these violations, is subject to a state fine. To avoid penalties, you should be fully aware of how to properly install and operate the lighting fixture.
Regulatory aspects
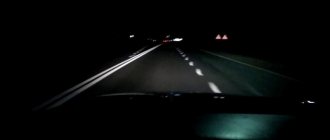
The Regulations of the Road Traffic Regulations state that every car must be equipped with special lighting equipment for the rear of the car, capable of being switched on when the side lights are operating. Accordingly, it must be activated in the dark so that the traffic police inspector can easily distinguish the symbols of the vehicle’s “mini-passport” from a distance of at least 20 meters.
The fine for the lack of illumination of the rear license plate and, accordingly, its unreadability is 500 rubles.
The possibility of losing your driver's license for a period of 6-12 months with confiscation of the lighting device is also present. The owner of a vehicle may be subject to such punishment for illuminating the front registration plate, since according to regulatory documents it must be absent.
Replacing a room light bulb
As easy as pie
The traffic police may have questions if the license plate illumination does not work.
A fine may not be issued for this, but an unpleasant aftertaste will remain, and time will be wasted. And since replacing the license plate lamp is as easy as shelling pears, it’s worth doing it yourself. It will be faster and more reliable, and, of course, cheaper than carrying out such work in a car service center. Here you can slowly do everything right, and not somehow. Unfortunately, many service stations treat cars and minor repairs this way. Since anyone can change a license plate light bulb, this does not require special skills or knowledge. A minimal set of tools and a little free time are enough, and then you can safely start doing the work.
Improved lighting
License plate lighting is not a problem; it can be implemented by upgrading the standard lights. Today, LEDs are most often installed in the form of strips, rulers and modules. However, going overboard with the number of LED items can be regarded as a change in the design of the vehicle.
To avoid punishment, you should remember two things:
- Firstly, a violation in the lighting of the state registration number can only be proven if the vehicle is in use.
- Secondly, changes that have been certified by the State Traffic Safety Inspectorate cannot be considered illegal.
An example of replacing lighting on different cars
To change a burnt-out license plate light bulb, you need to:
- clean the area where the lampshades are located from dust and dirt;
- remove decorative trim;
- clean the surface of the lampshades;
- unscrew the screws;
- remove the lampshades;
- remove the lighting fixture;
- make sure it is faulty;
- replace light bulbs with new ones;
- check the functionality of the unit by turning on the lights;
- secure the lampshades by first lubricating the screws with silicone grease;
- Reinstall the fastening of the trunk lid trim.
Replacement can only be carried out when the power supply is de-energized. This way you can avoid the occurrence of a short circuit if the cartridge is destroyed or accidental contact of contacts occurs.
The basic algorithm for replacing license plate lamps can be changed depending on the make and type of car.
Hyundai Santa Fe
First, let's look at how to replace the headlight bulb on a Korean Hyundai. For work we will need:
- Crosshead screwdriver.
- 2 W5W bulbs.
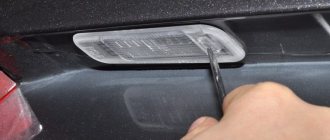
Each of the license plate lamps on this car is attached using a self-tapping screw and an L-shaped clamp. I marked the location of the screws with red arrows and the locations of the clamps with green arrows.
We unscrew the screw and remove the flashlight, disengaging the latch. The wire powering the lampshade is quite short, so we pull out the light fixture carefully and without fanaticism.
Removing the lantern
Now we see the cartridge with power wires (photo above). Turn it counterclockwise and remove it along with the lamp. The light bulb is removed from the socket by simply pulling it out. We dismantle the burnt one and put a new one in its place. We install the cartridge in place, fix it by turning it clockwise. All that remains is to put the illuminator in place and secure it with a self-tapping screw.
Hyundai Solaris
Both lamps, which provide room illumination, are located in the Hyundai Solaris under the trim on the trunk lid. To remove them, you need a flathead and Phillips screwdriver. The dismantling process looks like this:
- using a flat-head screwdriver, open the cover in the handle;
- remove the handle by unscrewing the screws with a Phillips screwdriver;
- remove the pistons holding the casing in place;
- remove the casing;
- unscrew the cartridge clockwise;
- remove the lamp, holding it by the glass bulb;
- install a new light bulb;
- Reassemble in reverse order.
Interesting video on the topic:
Volkswagen Tiguan
The list of tools intended for replacing headlight bulbs in a Volkswagen Tiguan includes gloves and a Phillips screwdriver. Lamps – C5W. To reinstall you need:
- open the trunk lid;
- remove the lampshades by unscrewing the screws;
- unplug the light bulb from the spring clips;
- install the new device by snapping it into the latches;
- return the lampshades to their place and secure them with self-tapping screws;
- check the result using the side lights.
This is interesting: First and subsequent maintenance of Lada Granta: maintenance, features
Toyota Corolla
To get easy access to the backlight lamp of this brand, you will have to lower the flashlight diffuser down. To do this, you will need to lightly press the tongue.
Further actions are performed in the following order:
- unscrew the cartridge by turning it counterclockwise;
- unscrew the screws;
- remove the lamp holder;
- remove the non-working old one;
- install a new light bulb;
- assemble the structure in reverse order.
We recommend videos on the topic:
Toyota Camry
To replace the backlight bulb in a Japanese Toyota Camry, you need a flat-head screwdriver. Lamps – W5W. Then follow these steps:
- open your trunk lid;
- release the upholstery opposite the lamp, carefully removing the plastic pistons (use a flat screwdriver to pry up the latch, pull it out and remove the pistons from the upholstery, holding it by the head);
- bend back the upholstery (the back of the flashlight, the socket and the power supply connected to it should open);
- pull out the block;
- squeeze the flashlight clamps;
- push the lantern out;
- pry off the protective glass with a screwdriver;
- remove the protective glass;
- pull out the burnt out light bulb;
- install new lighting;
- snap the glass;
- insert the flashlight into the socket and push it in until the latches click;
- check the operation of the backlight by turning on the side lights;
- assemble the structure in reverse order.
Nissan Qashqai
On this model, replacing the license plate lamp is even easier, since the lamp is attached using latches. We arm ourselves with a flat screwdriver (the author of the photo used a plastic card) and pry the flashlight from the side located closer to the center of the car.
Removing the lampshade using a plastic card
Carefully remove the lampshade from its seat and get to the socket.
Turn the socket counterclockwise and remove it along with the W5W bulb. We pull out the burnt out device, insert a new one and install the lamp in place, making sure that the latches snap into place.
Lada Priora
Here the Lada Priora will act as a “test subject”, in which you don’t even need to dismantle the lamp to replace the license plate light bulb. Open the trunk lid and find the back of the lamp sockets, focusing on the location of the lamps.
We take the socket, turn it counterclockwise until it stops and remove it from the lantern along with the light bulb.
We pull out the burnt out device (W5W) and install a new one in its place. We turn on the dimensions and make sure that everything works. We return the cartridge to its place and fix it by turning it clockwise.
Lada Kalina
What tools will you need:
- flat screwdriver,
- a piece of rag
- new lamps.
The left side of the lampshade is made in such a way that you can place a thin object (in our case, a screwdriver) under it and pry it, releasing the first latch. This requires a little effort. If you are afraid of scratching the plastic, place a prepared rag under the tip of the screwdriver.
Once the left side of the latch has come out, move the lamp itself a little to the left and remove the right side. Pull the lantern out. Now you can either disconnect the wire, or simply turn the lamp a little and remove it from the housing.
The light bulbs in the license plate illumination are the most common ones - W5W. The same ones are in the front side lights. We take out the old incandescent lamps and insert new ones - LED ones. It’s better to immediately check whether you placed them on the wrong side; LED lamps have polarity! Well, now, with a clear conscience, everything can be put back together. The license plate light bulbs on Kalina have been replaced.
What advantages will we get after replacing the standard license plate light bulbs with LED ones?
- Firstly, they shine much brighter. This is noticeable even to the naked eye. And at the same time they consume much less energy, which leads to at least insignificant savings.
- Second, they don't get so hot. Having removed the old lamps, you may have noticed some melted plastic near their seats. It is not good. This definitely shouldn’t happen with diode lamps.
- And last but not least, it looks beautiful. Agree, the bright, white backlight of the license plate looks much better than the standard one.
About the intensity of the backlight and the permitted colors of LEDs
According to GOST, the light of rear registration plates must be white or yellow, or shades thereof. Thus, any other color of lighting may be regarded as a violation and subject to a corresponding fine of 3,000 rubles, since colored LEDs can confuse drivers following and provoke a traffic accident.
License plate lighting is not a problem; it can be implemented by upgrading the standard lights
Taking into account the standards, it is possible to change the tonality and saturation of the lighting. However, this must be done without attracting the inspector’s attention by using too bright a light, which leaves a mark on the road surface, as well as using excessive amounts of license plate lighting of other colors.
Lighting Retrofit Attributes
The spiral number illumination used in factory flashlights can be replaced with similar LED bulbs of a more powerful spectrum. The standard size of the LED for a light bulb with a standard base ranges from SMD5050 to COB matrices. The main positive quality of such light bulbs is their compatibility with the on-board computer (BC), that is, it will not generate errors when installing LEDs. Lamp prices depend both on the desired power and on the manufacturer. On average, a set of LED devices consisting of two lamps can be purchased for around 300-400 rubles.
For illumination of registration symbols with an LED module, the vehicle owner will have to pay at least 600-800 rubles. But such an LED device also has an advantage: their geometric dimensions exactly repeat the standard lampshades, i.e. no need to redo the fastenings.
A budget-friendly way to solve the problem of license plate illumination is to stick an LED strip above the number or around the perimeter. It is important to remember that it can only be glued to a place that is free of dirt and oil, otherwise the durability of the tape is not guaranteed.
In conclusion, I would like to say that you should strictly adhere to the rules for operating the car and treat the car's lighting fixtures properly. Before leaving, always check that the headlights are working properly so that both the rear and front license plate lights are functioning - this will ensure easy readability of the license plates. Take prompt action to correct any problems.
We are looking for the cause of the malfunction
Statistics show that the lamp burns out only in 40% of cases. Often the problem lies not there. It is advisable to start from simple to complex and do the following:
- Clean the backlight lamps from dirt, dust, etc. with a rag. Visually we try to determine whether there is darkening of the light bulb, condensation inside or damage to the lampshade due to high temperature.
- Usually two lamps are installed. If one of them is on, then the problem is not in the fuse or wiring. When you tap on the lampshade, the lamp lights up and goes out, which means it doesn’t sit well in the socket.
- If none of the lamps light up, check the mounting block for blown fuses. If they are all intact, then we call the wiring.