Tuning Bleeding optics Do-it-yourself xenon installation - a practical guide
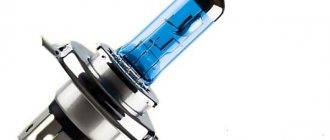
Xenon is an inert gas that is odorless, tasteless and colorless. One of its features is that when an electric current is passed through it, this gas becomes a powerful source of light. There are several reasons why xenon has gained immense popularity among car enthusiasts.
Xenon lamps produce very bright daylight, and this is more familiar to human vision. They have high light output and allow a wider view of the road in front of the car.
Xenon lamps are durable, very economical and resistant to physical influences. In addition, they are quite easily installed in cars instead of standard lamps. It is this process that we will look at below.
What is the difference between xenon and bi-xenon for cars
The main difference between xenon and bi-xenon is the operating mode. Xenon works only in one way - low beam, which is why it is not enough. This is especially noticeable when driving at night at high speed on a country road. Bi-xenon operates in two different modes: low beam and high beam.
Switching between low and high beam is carried out by changing the position of the arc. This is achieved by installing special movable electrodes in the lamp. They change their position on command given by a special regulatory component. The design of a xenon lamp involves fixing the arc. It is impossible to change the position.
When choosing between xenon and bi-xenon, the following points should be considered:
- difference in design;
- view of the headlights pre-installed in the vehicle.
In modern cars, bi-xenon is used more often
Vehicle headlights can be divided into two main types:
- when only one lamp is mounted, it operates in the near/far mode;
- Each glow mode has its own light source.
This is interesting: Replacing a car steering wheel yourself
Is it legal to use bi-xenon in the Russian Federation: GOSTs and requirements of the Administrative Code
It is necessary to focus on the document “On the use of xenon headlights”. It was formulated by the Security Department of the Ministry of Internal Affairs of the Russian Federation on February 20, 2010. In accordance with it, it is allowed to install headlights with the following range designations on cars:
- GOST R 41.112–2005 (direct incandescent lamps): C - low;
- R - long range;
- CR - headlights operating simultaneously in two modes;
- HC - near;
- DC - near;
If there is a need to replace conventional incandescent or halogen lamps with xenon, you should carefully read the state standards. This way you can avoid a significant fine. The situation is similar with PTF (fog lights). These lighting fixtures are not required. Fog lights are subject to the same requirements as standard headlights.
In the worst cases, for incorrectly installed xenon, you can say goodbye to your license for six months
When installing xenon or bi-xenon headlights not intended for this purpose, liability arises, regulated by Part 3 of Art. No. 12.5 Code of Administrative Offences. If traffic police officers establish the use of such equipment, the driver’s license may be confiscated for a period of 6–12 months. The lamps themselves will be confiscated, but there will be no fine.
Video “Illustrative example of xenon installation”
The video below provides detailed and visual instructions for installing xenon lighting using the example of a Hyundai Accent car (the author of the video is the Parking channel).
Similar articles
Legal xenon - myth and reality: recommendations of the servants of Themis
Xenon in fog lights without deprivation of rights and a fine: when you can’t, but really want to
Low beam lamps are the most important element of automotive lighting
Optima xenon lamps on the automotive lighting market: what should you know?
Types of xenon: h1, h4, h and others
All light sources are divided into different types according to the type of base. Car headlights are equipped with flanged lighting components. They have a spiral tolerance on the flange itself. For example, lamps of type H1, H7 are characterized by the following configuration:
- the spiral itself is folded as compactly as possible;
- the spiral is stretched to its maximum length along the optical axis of the reflector.
Interchangeability of halogen and xenon lamps
There is a special standard for PTF headlights. The spiral is usually located perpendicular to the optical axis. Lamps for fog lights are marked as H3. A special, rarely encountered standard is R2. It is used in outdated two-headlight systems. Most vehicles today are equipped with H1 and H7 lamps.
An equally popular standard is H4. They are used in many mid-priced vehicles. A distinctive feature is the ease of installation, replacement and adjustment if necessary. The main disadvantage of such a lamp is its relatively low light output.
What light bulbs do experienced drivers recommend installing?
Important factors are cost, as well as the brand of specific equipment. If possible, you should not save money; it is recommended to purchase xenon/bi-xenon from well-established brands. The most well-known manufacturers in this segment of automotive equipment are:
- MTF-Light is a reliable brand from South Korea (you can purchase lamps with blocks, as well as bulbs from Philips);
- Sho-me is also a Korean manufacturer of budget xenon optics for a relatively low price;
- Matrix is a little-known manufacturer, the cost of products is slightly above average, the quality is at a fairly good level (Taiwan);
- IPF - according to consumer reviews, the company offers the highest quality xenon of all existing ones (Japan);
- Optima - offers high-quality lamps at low prices (China);
- Interpower is a Chinese manufacturer that produces a relatively high-quality product at a low cost.
Product examples (photo report)
The optimal solution is to purchase xenon or bi-xenon from the Japanese company IPF. At the same time, there are many budget alternatives. You should avoid purchasing “noname” (“gray”) products. This term means xenon (lamps, etc.) without brand designation, marking, or country of manufacture. Installation of non-standard lighting equipment may result in revocation of rights.
This is interesting: Washing the engine with your own hands
Example of step-by-step installation of bi-xenon lamps
Installing bi-xenon is most relevant for owners of old cars. The installation process on a Lada 2108 export 1.6i turbo is as follows.
- You should unpack the box and check that all the necessary components are present - usually a pair of lamps, two ignition units and connecting wires;
Check the completeness on site!
- In accordance with the connection diagram, it is necessary to connect the electrical wiring and the bi-xenon kit itself: brown wire - negative;
- white - near;
- blue - distant.
Use the diagram when connecting
Xenon connection diagram
The hole should not be too large
All that remains is to install the ignition units
Ignition units may be sold separately
In the example, a place for the block was found at the washer reservoir
Much better than standard optics
It is important to remember to fine-tune the type of lighting in question. If you do not have such experience, you should contact specialists at a car service center. In most cases, the necessary actions are simply impossible to carry out without special measuring scales. If possible, you should carefully read the video before installation.
How to connect yourself: video tutorial
Which PTFs are better for xenon
Before installing xenon in fog lights, you should select the headlights themselves correctly, which will ensure the effectiveness of PTF in fog and will not cause deprivation of your license. Lensed fog lamps are optimally suited for gas-discharge lamps; they form a balanced luminous flux and do not require complex adjustment procedures. When choosing the lamps themselves, it is better to give preference to those whose temperature is no more than 4300 K and whose color is close to lemon yellow.
The connection diagram for xenon fog lights is practically no different from connecting standard halogen lamps. The main thing here is to determine the location of the xenon ignition units. It would be optimal to place them from the inside behind the bumper, which will require removing the front wheels along with the wheel arch liners. You can attach the blocks with double-sided automotive tape, or come up with your own secure placement option. Before connecting xenon to fog lights, it makes sense to check all electrical wiring - the occurrence of short circuits can damage expensive equipment.
Features of selection and installation
There are a number of features and the most important criteria for the selection and installation of these lamps. The most frequently asked questions are covered below.
Choice depending on the geometry of the headlights (lensed, corrugated, etc.)
Today, if xenon is installed in headlights not intended for this purpose, special focusing lenses must be additionally mounted. In this case, the setup must be carried out in a certified car service center. Otherwise, there is a high probability of a mistake and you could easily be deprived of your driver's license.
Headlights with complex geometry are equipped with bi-xenon lenses in a car service center
What is a snag and how to install it correctly
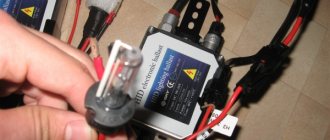
Xenon consumes significantly less electrical energy than halogen lamps. Therefore, the on-board computer can identify its installation as a lamp burnout - the circuit automatically turns off. This is exactly how everything works, for example, on the Opel Astra. The problem can be avoided by installing a capacitor in the circuit, which is called a blende. Thanks to it, the computer “does not notice” the absence of a corresponding load on the network. To install, the capacitor must be built in series into the wiring directly in front of the lamp.
Installation example next to the ignition unit
Is it possible to connect via a capacitor?
On some brands of vehicles, after installing xenon, power failures occur. This can be avoided by installing a special capacitor. It is mounted parallel to the main supply line. This allows you to smooth out the voltage drop when dips occur.
How to put a switch on a separate button
It is often necessary to turn on xenon with a separate button. Carrying out this procedure is not difficult. It is enough to install a two-position switch in the cabin, and then connect the line break to it.
What to choose: Video test of the most popular ignition units (in 2 parts)
Workflow Description
If everything is fine with you and all the necessary elements are present, then you can familiarize yourself with how to organize the workflow for installing new lighting elements; there is nothing complicated here, but you will need to be careful and carefully follow all the recommendations.
Preparatory stage
Let's immediately make a reservation that the xenon low beam lamp is used only in headlights with separate beams; if you have it combined, then you will need bi-xenon.
Xenon lamps for low beam and high beam are called bi-xenon
If you have a separate version, then the following parts will be required for work:
- Two H7 low beam xenon lamps, you need to purchase high-quality options so that there are no problems in the future. Products differ in brightness, which is measured in degrees Kelvin and indicates the nature of the glow of a particular product, so xenon in low beam 3000k will have a yellow tint, and the 4300k version is much lighter, when marked 5000k the light will resemble daylight, and so on;
The H7 xenon low beam lamp has the same socket as conventional halogen versions, so there is no need to remake the mount - An ignition unit must be supplied with each lamp, since in order for the xenon to glow, a voltage of 25,000 volts is required;
- Naturally, to connect all the components you will need wires; they are also included in the kit, so you won’t have to look for them additionally;
- Each element has a separate fuse;
- There must also be fastening elements with which installation will be carried out and instructions for installing the structure.
Important! If the kit does not include relays, we recommend purchasing them separately; these elements are necessary so that at the moment when the low beam is turned on and the xenon is ignited, the standard wiring of the car is not overloaded. The usual four-pin options are suitable; the connection diagram is presented below.
This is what the optimal connection diagram looks like
Installation
If everything required is at hand, then you can begin work; the process is carried out as follows:
- First of all, it is necessary to remove the terminal from the battery; this is an immutable rule when working with any electrical equipment of a car;
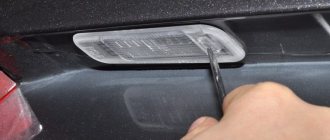
- Next, to ensure convenience, you need to remove the headlights from the car. This process may vary depending on the brand of machine. For example, for KIA headlights, dismantling instructions are most often found in the instruction manual, or they can also be found on the Internet;
- Now you need to open the headlight cover and remove the halogen bulb, everything is quite simple and quick. If you additionally purchased a xenon low beam lens for your modification, then the old unit must be removed from the mounts; it can be either a regular reflector or a halogen lens;
The design of such lenses is specially designed to work with xenon lamps
- Next, the light bulb is placed in its seat, a hole is made in the rubber or plastic plug for the wires;
- Then the wiring is connected to the ignition units, which should be located away from the engine in a dry place, most often they are mounted near the headlight on the inside of the fender;
- A relay is installed behind the ignition unit, which will remove the load from the car’s wiring, which is very important for cars that did not initially have xenon installed, as their electrical system may be overloaded;
- Lastly, the wiring is connected to the network, now you should connect the battery, after which you can check the operation of the system;
- After connecting, be sure to adjust the headlights at a car service center, as it is difficult to do this yourself and you will blind oncoming drivers.
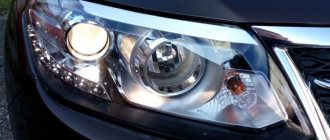
After setup, you will enjoy high-quality light
Xenon is installed in additional low beam headlights in a similar way, so there is no point in describing the process separately.
As for maintenance, you should keep the glass on the headlights clean and prevent moisture from entering the housing.
If you want to know why the xenon blinks in the low beam, then most often it is:
- the first sign of a failing light bulb;
- but the reason may also be poor contact, it’s easy to check: swap the lamps - if the blinking starts on the other side, then the lamp is to blame, if it blinks on the same side, the contact or ignition unit is to blame.
General information about xenon
Before you independently install xenon on your own car, you need to have a general understanding of xenon optics. Xenon is an inert gas that is currently actively used in the production of automobile headlights. While in Europe there are certain restrictions on the use of such optics, in Russia any type of xenon lamps can be installed.
What xenon headlights are is explained in the video:
Using xenon provides several advantages:
- Increased lighting efficiency, significantly superior to traditional halogen headlights.
- High power, while in order to protect against dazzling oncoming drivers, headlights must be installed at a certain angle of inclination together with correctors that change the angle of inclination of the optics when driving on uneven areas.
- Duration of operation. On average, xenon lamps have ten times longer service life compared to halogen lamps.
general information
Car headlights are the most important element of a car, because they provide a good view of the driver and prevent him from getting into an accident.
Moreover, the lamp installed in the headlight is no less important, since its characteristics ensure proper luminescence and penetrating power, and this, in turn, can play a big role in bad weather conditions or the need to react quickly in an emergency situation.
Therefore, you should choose the best type of headlights and bulbs for them in order to feel as confident as possible on the road.
The most favorable situation will be one in which xenon light is already installed in the headlights; it will be considered standard.
There may also be nuances associated with the absence of a light bulb of this type from the factory, but theoretical compatibility with xenon, as evidenced by the markings on the lighting fixture.
But you need to understand what is good about standard xenon, and how you can change the type of light if such a need arises.
Initial data
Xenon lamps work thanks to an electrical impulse that ignites the gas in the bulb as it passes through it.
Their light is similar to daylight, so drivers’ eyes are most accustomed to this type and can distinguish even small details.
Unlike other headlights, xenon headlights also have fairly clear distribution boundaries and are also aimed precisely at the road. If adjusted correctly, this eliminates the possibility of blinding oncoming and driving drivers ahead, and also does not give the traffic police inspector the right to issue a violation.
If xenon is not provided as standard, but the driver wants to equip his car with it, then he will have to collect a lot of documents and spend more than a month of his life to obtain permission to convert the car in the manner prescribed by law.
The list of actions required for this also includes an inspection of the car by experts, both the traffic police and independent ones, as well as the re-issuance of documents, which will ultimately include a mark on the legal installation of headlights.
What is included in its package
Xenon is always used with additional technical means, without which it will not be possible to ensure the normal and correct functioning of the entire system.
So, in addition to xenon lamps, the kit includes an ignition unit that ensures the lamp burns, a system of lenses that collect light into a beam and direct it directly onto the road, and among the items that are not part of the headlight itself, there is an auto-corrector and a headlight washer.
The first helps to adjust the headlights to the position of the car on the road, that is, its elevation, and the washers clean the headlights when they are dirty, since any foreign particle on them can cause severe distortion of the beams, and, as a rule, lead to blinding drivers of oncoming cars.
Thus, in addition to the xenon lamp, a device is added to the kit that is responsible for the operation of the bulbs themselves, correction and cleaning equipment and lenses that focus the light.
From the factory, the light is supplied in a complete set including lamps, but subsequently they will need to be changed, selecting them according to the specific type indicated in the headlight itself.
If there is a need to change the headlights to xenon ones, you need to choose exactly the equipment that fits the car itself so the work will be more reliable.
Current legislative framework
The rules for the use of xenon are stipulated in the Vehicle Operating Rules, according to which a vehicle involved in road traffic must comply with the safety rules for vehicles.
This means that all systems, in particular the headlights, must be in working order and correctly adjusted, and the equipment must be such as is provided for by the design of the car itself; if it turns out that this requirement is not met, the driver will be punished.
The penalty itself for the use of xenon headlights not provided for by the design is stipulated in the Code of Administrative Offenses and its Article 12.5.
It says that if a driver drives a car with headlights or lamps that do not correspond to those specified in the registration certificate, or their color or adjustment differs from the norm, then the motorist must be held accountable; according to the law, it provides for deprivation of rights for up to a year, but There is no penalty for non-standard xenon and there is only one sanction.
What is xenon in a car and is it allowed to install it yourself?
A special feature of xenon lamps is the absence of tungsten filaments inside them. In such a light bulb, the special gas pumped into it, xenon, is heated.
This type of lighting has a lot of advantages, the main ones being the light that is as close as possible to daylight and a long service life, and certain disadvantages - in conventional headlights that are not designed for this purpose, xenon light blinds oncoming drivers.
In addition to the xenon lamps themselves, you will also need to install high-voltage units (popularly called “ignition units”), because igniting the xenon inside the lamp requires a voltage of up to 25,000 Volts, which no car battery is simply capable of providing.
Is self-installation of xenon allowed?
Whether it is possible to install xenon yourself or not is a controversial issue. After all, you can get a fine for unauthorized installation of non-standard optics. So, before you start acting, it is better to clarify the situation with the traffic police officers, because few people want to pay money for a xenon kit, spend a lot of time and effort to install it, and at the same time make additional problems for themselves.
The thing is that the traffic rules do not clearly indicate that xenon is prohibited. However, the Decree of the Government of the Russian Federation No. 720 of September 10, 2009 “On approval of technical regulations on the safety of wheeled vehicles” states that no changes to the braking system, lighting devices and steering are allowed. Therefore, before purchasing xenon and installing it on a car, you should think carefully.
Those same car enthusiasts who doubt the legality of installing xenon lights in standard headlights can go the other way - install xenon in foglights, which is allowed even according to the above technical regulations.
Installing standard xenon
Standard xenon is usually installed at the factory, which guarantees high quality work and reliability of lighting devices.
You can find out about this when buying a car, but even with the naked eye you can see how the xenon is installed, if the ignition units are inserted carefully, at least an auto-corrector is attached to the headlight, and the light is even and meets the standards, then the installation was carried out correctly.
If the driver wants to make xenon standard by changing the headlights to suitable ones, he must first obtain approval from independent experts and the traffic police in order to exclude illegality of actions.
After permission, you need to take the car to a specialized service or do the work yourself, but you need to take into account that the adjustment and correct installation of headlights in the second case is entirely on the driver’s conscience.
After all the mandatory certified equipment has been installed, it is checked again by experts, and the traffic police receives updated documents with a note about the replacement of the light.
How to find out if he is one
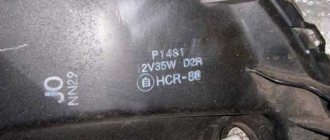
To find out whether xenon lamps can be considered standard in a particular car, you need to open the hood and remove the back cover of any headlight.
There should be a marking with the letter D, which means that the lighting device is designed to use a xenon lamp and this will not be illegal.
In addition, you can look into the headlight itself, where xenon will be standard if there is a curtain that limits the light from entering the oncoming lane, and the lamps themselves are connected to the ignition unit, which is a rather unique device.
But the most reliable marking will be, and if it is present, then you can definitely use xenon light.
On what principle does it work?
Standard xenon is a lamp that is filled with xenon gas. Its qualities are such that when electricity passes from the ignition unit, the light bulb lights up with white light with possible blueness.
In addition to the light bulb itself, a mandatory device in this chain is the ignition unit itself, which has a separate power that affects the quality of the glow and its intensity.
In addition, to ensure the normal operation of the xenon light, you need to take care of durable wiring, since it carries a significant load.
Cars in which xenon is provided from the factory have no problems with this, and the wires fully comply with the technical requirements, but if xenon is installed during conversion, then of course the wires will need to be changed during the processing process.
What to consider when choosing an ignition unit
When selecting a specific ignition unit, it is necessary to take into account the driver’s needs for light.
There are two types of block - 35 Watt and 50 Watt, the first provides acceptable light, which is enough for careful driving without incident, the second makes the light and its brightness larger, but if the adjustment is made incorrectly, it will simply blind drivers.
If there are plans to constantly use a 35-watt light bulb, then there is no need for a powerful unit, since it will not give the expected result, and vice versa, if the lamp has a power of 50 watts and the unit has a power of 35 watts, then the lamp simply will not work at full capacity force, which, as in the case of increased load, will not be a good moment for her.
How to convert headlights
In some cases, drivers are not satisfied with the headlights they have in their cars. The reasons may be different - the equipment does not shine well, it blinds drivers, or it is not suitable for the eyes.
Why you need stickers for xenon headlights, see the article: stickers for xenon headlights. If you are interested in the question of whether it is possible to take the traffic police exam online, read here.
In this case, you will need to change the entire headlights, because xenon options are quite different from others, they have special glass and a set of technical devices, so other bulbs in them will not shine as they should and, most likely, will blind other drivers. But installing lensed xenon in standard headlights will not be considered an alteration.
To LEDs
To change the headlights to LED ones, it is necessary to change the design of the car, since they differ structurally in small details, and their use in a xenon headlight can be fraught with consequences.
But by the way, if you turn to the experts, together with them select the most compatible headlights and fit them by adjusting them on the stand, then it is quite possible that they will not dazzle.
But it’s still better to purchase a lighting kit originally designed for LEDs in order to get rid of incompatibility problems and, of course, not create emergency situations.
Safety precautions when installing xenon
During the installation of xenon, some difficulties may arise, so you should be prepared for complications:
- Work must be stopped immediately in cases where there is obvious damage to lamps, ignition units or wires.
- Before installation, you must wash your hands thoroughly, because greasy, oily or wet fingers can not only render the lamps unusable, but also increase the risk of electric shock.
- All wire connections must be carefully insulated with high-quality electrical tape, because contact with water can lead to a fire.
- It is not recommended to look at working xenon headlights for a long time, as there is a possibility of damaging your eyesight. This can only be done with tinted glasses.
- Before installation, be sure to degrease the lamp bulbs using a cloth and alcohol.
As you can see, installing xenon is not such a difficult undertaking, and you can do it yourself. You just need to take this issue seriously and follow our recommendations step by step.
How to install xenon headlights="ltr">
To understand how to properly install xenon, we carefully prepare.
Correct installation is divided into several stages:
- Installation of xenon bulbs:
Installing xenon with your own hands is a fairly simple process, but it will require careful handling and concentrated attention. You will need to:
- sequential installation of lenses, and then installation of the ignition unit;
- connecting electrical cables, as well as connecting devices to the main electrical circuit.
When we get started, be sure to stay safe. To start working, a xenon lamp will require a current exceeding 20,000 V! Therefore, first we remove the battery terminals, then remove it entirely.
ATTENTION! Do not touch the xenon lens shell with your hands. Once you have already touched it, wipe it very carefully with alcohol and a clean, soft cloth.
Remove the protective cover from the headlight unit. Disconnect the wires from the terminals of the base lamps and pull them out. Sometimes they can be pressed using a locking spring; it needs to be pressed out.
We slowly pull out the xenon lamp, without touching the lens shell, and put it in the place where the old one was. We do the same with the second lamp. If you had to release the spring, return it to its original state.
- Installation of ignition units
Correct installation of these parts takes into account the following:
- they must be placed not far from the headlight, so that after the lamps are connected, the wires are not strained and there is a possibility of reliable fastening;
- the location must be inaccessible to dirt, moisture or heat;
- The basic mounts in a set of xenon lamps must be placed on a static and durable surface.
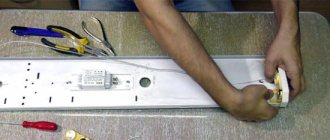
- Assembling the electrical circuit
When the xenon bulbs and ignition are installed, we connect their contacts using wires. Each of the wires and the corresponding terminal has its own color, so it will be problematic to confuse the connections. We connect the ignition unit to the car's electrical circuit using the connectors of the base lamps that were installed before.
We make sure that we have not made any mistakes using the instructions. If everything is correct, we secure the entire bundle of wires with clamps so that they do not have the opportunity to dangle. Carefully roll the extended cords into a ring and secure them.
If the car's wiring has a connected on-board computer, problems may occur when installing xenon optics at the ignition stage due to a sharp increase in current load. Then we install an additional voltage relay so that it equalizes the load on the electrical wiring of the machine.
Mayya › Blog › What you need to know about installing xenon
1. First of all, let's decide whether you have standard xenon or not. If your car is a Zhiguli, then in principle you can immediately move on to the next point. Xenon headlights were not available for Lada cars. Never. And I haven’t seen factory-made “tuning” options. If you have a foreign car, then go to your headlight and begin to carefully study it. On new cars, xenon is required to be produced with a headlight washer (xenon lamps greatly lose efficiency due to dirty glass) and an automatic corrector. It's automatic, not electric. The corrector must itself adjust the height of the light depending on the vehicle load. You can check for its presence by rocking the car or see how the car behaves when starting. I would like to draw special attention to the fact that changes were made to the currently valid GOST R 51709-2001 on June 23, 2009, namely, the requirement for an automatic corrector was excluded (clause 4.3.2.2.) This means that they do not have the right to require it. But if it is there, then this is an indicator that xenon is definitely installed by the manufacturer. If we have not found an automatic headlight leveler and headlight washer on our car, then perhaps the xenon was not supplied by the manufacturer, but this does not mean that it does not meet the requirements. First of all, you need to check the matching of the headlight and lamp. In other words, if you have a xenon lamp, then the headlight must match. Markings on headlights are made according to international standards, so we will look for this very marking. By the way, I think since you are reading these instructions, you have a xenon headlight, so we will look for the markings specifically for xenon. To begin with, we take a very close look at the headlight glass itself. The marking can be anywhere and not immediately noticeable. If we don’t find it on the glass, then open the hood and look on the headlight housing. There must be a marking somewhere. If the headlight is fully marked, then it should also have the letter E in a circle next to the type of headlight. We're looking for something with a D in it. It could be DC or DCR, but it could also be something else. For example D2R or D2S. The first letter D means that it is a xenon lamp, and the rest are its type. Well, for example, DC is only low beam, and DCR is both low and high beam. But this is no longer important, because the main thing is that the headlight is designed for a xenon lamp and there should be no complaints from the traffic police. But since the inspector may not have read our instructions and may not know how to correctly distinguish the lamps, it is better to read the instructions completely. If we find the HRC or any other marking with the letter H on the lamp, this means that the headlight is intended for a halogen lamp and it is prohibited to install xenon in this headlight. Markings are also possible simply C, R and CR - for ordinary incandescent lamps, but I have not seen such ones. Apparently these are very old cars. Separately, I would like to say about those headlights that have several different markings. This is one of two options. Or (and this is allowed by international standards) all types of headlights from the manufacturer are marked on the headlight, and a specific type will already be in the form of a sticker on the headlight. Or the headlight actually allows the installation of different lamps (although people from the traffic police science say that this is not possible), lamps are simply installed (reflectors, lenses, etc.). In both of these cases, in my opinion, it is not possible to reliably prove the driver’s guilt and Article 1.5 should apply. about irremovable doubts about his guilt. If we are convinced that our lamp does not meet the requirements, then move on to the next point in the instructions.
Xenon installation instructions
The process of installing xenon with your own hands, instead of standard car lighting, is simplified year after year. And if earlier for this it was necessary to significantly change the wiring in the car, use special adapter rings and other devices, today it is enough to make a decision regarding 2 points:
- Lamp type - it can be xenon or bi-xenon;
- Base type - to simplify installation, xenon lamps must be purchased with the same base as the standard halogen lamps installed in the car from the factory.
In some cars, the optics are designed in such a way that the high and low beam bulbs are separated. In this case, installing bi-xenon is impossible - only xenon. In other cases, you can install bi-xenon, and then switching from low to high beam will occur in one lamp.
A xenon kit for installation on a car must include the following components:
- Ignition blocks – 2 pcs.;
- Xenon lamps – 2 pcs.;
- Fasteners (required for installation);
- Set of wires;
- Installation and connection instructions.
Typical xenon (bi-xenon) connection diagram
To successfully install xenon with your own hands, it will be enough to follow the instructions that come with each kit. The main thing is to strictly follow the sequence of actions described in the instructions and safety precautions.
Below we provide a step-by-step guide to installing and connecting xenon, compiled by our specialists. For detailed video instructions, see the end of this article.
And so, the sequence of actions performed when installing xenon will be as follows:
- Removing the old lamp . To install xenon lights, you first need to remove the old halogen lamps from the headlights. To do this, remove the plastic protective cap that covers the base on the back of the headlight, and, pressing the metal clip, remove the old light bulb from the socket.
- Installing a xenon lamp . In place of the old one, it is necessary to install a new xenon lamp (previously removed from the transport packaging) into the headlight and secure it with a spring clip.
- Connecting contacts . Observing the correct polarity, connect the power contacts from the old lamp to the terminals from the new one. Carefully insulate the connection points of the wires with electrical tape or heat-shrink tubing.
- Laying wires . As a rule, the protective caps that cover the bulb sockets on the back of the headlight do not have any holes. To lay the wires in each cap, you need to use a construction knife or other convenient tool to cut a neat hole for the rubber O-ring from the wires included in the xenon kit (see the video below). After this, the wires are pulled into the resulting hole, carefully placed in the headlight and closed with a cap. Note : If you did everything correctly, then, as a result of completing the previous steps, you should have a xenon bulb in your headlight, covered with a protective cap, from which two wire harnesses should come out to power the ignition unit and the xenon lamp.
- Xenon connection . In this step, you just need to connect the wires coming out of the headlight to the xenon ignition unit. It is almost impossible to reverse the polarity or insert the plugs into the wrong sockets, since all wires are marked with the appropriate colors, and the sockets have special protection.
- Installation of the ignition unit . The xenon ignition unit is fixed under the hood. However, there are places where its location can cause a lot of trouble. To avoid this, it is not recommended to install the units in areas where water can easily seep in, or near the engine. In addition, the wires should not be too tight.
These operations are performed on both headlights: both the left and the right.
Auto parts and service stations
The popularity of xenon gas-discharge bulbs for cars is due to their better efficiency compared to other lighting sources. It is possible to connect xenon both in a car service center and independently.How to choose a good xenon kit?
The selection of a suitable xenon lighting source for a car should be based on two factors: the popularity and reliability of the manufacturer and the required brightness of the lamps.
What should a xenon kit consist of?
The complete set of gas-discharge bulbs for headlights or fog lights includes:
- lighting sources designed for a certain power and with specific markings;
- ignition device;
- a set of wires and elements for connecting and fixing lamps.
The ignition unit is a module designed to supply a certain amount of voltage required for activation to light sources. More expensive units have a more complex design, which allows them to control a larger number of processes. If the device is of high quality, it will be able to ensure long-term and uninterrupted operation of the light elements. This is due to the fact that when igniting the lamps, the basic technical parameters are observed within the required range.
How to connect xenon
Xenon lamps for car headlights work on a different principle than conventional halogen lamps. They do not have a filament. The glow occurs not as a result of its heating, but due to the burning of an electric arc. For it to occur, it is necessary to change the voltage characteristics of the car's on-board network, so the xenon connection diagram involves making some changes to the standard wiring of the car.
The inert gas, which fills the lamp bulb under high pressure (about 25 ATM), prevents the burnout of its electrodes. Thanks to this, the service life of the lighting device increases to 3000 hours (versus 600 hours for a halogen lamp). The electric arc also provides a higher intensity of luminous flux than the glow of a heated coil. Due to these two advantages, some car enthusiasts are interested in replacing conventional halogen lamps with xenon lamps.
How to choose xenon lamps
Lamps are selected according to several component criteria.
HID lamps are manufactured according to standards. To replace halogen lights H7, H11 or any others, you must purchase products with the same markings.
In halogen lamps with sockets H4, HB5, H13, different filaments are used for high and low beam. Similar gas-discharge ones are called bi-xenon. In them, the change of operating modes occurs due to changes in the positions of the bulb or reflective curtain using electromagnets.
By glow temperature and power consumption
Xenon lamps indicate the so-called color or spectrophotometric temperature (in degrees Kelvin). By its value, you can determine in advance how comfortable driving will be in the dark. In natural daylight, the color temperature is from 6000K.
You can get an idea of what the light from headlights with lamps of different color temperatures will look like from the following image.
When choosing xenon for fog lights, it is better to give preference to lamps with a temperature of 4000 - 4300K. The closer the emission spectrum is to yellow, the less the effect of a light wall in front of the car that occurs in fog. For low and high beam headlights, xenon lamps with a temperature of 4300 - 6000K are closer to natural light.
Lamps also differ in power consumption - it can be 35 and 50 W. As a rule, drivers prefer 35 W lamps - they “load” the car’s on-board network less and do not heat up the headlights as much.
Most popular manufacturers
To ignite an electric arc, a voltage of about 25,000 volts must be applied to the electrodes. To maintain combustion, 50-80 Volts are sufficient. To ensure compliance with these operating conditions, a xenon ignition unit is required. When installing xenon for the first time, you need to purchase the entire kit - lamps, ignition unit and wires. The kit must be accompanied by instructions with a connection diagram. In the future, individual components can be purchased separately - as they fail.
Such well-known manufacturers of lighting products as Hella, Osram and Philips do not produce kits for self-installation of xenon. On sale you can only find lamps made by them or Chinese counterfeits.
Among others, kits of the following brands are in demand among Russian car enthusiasts:
- MTF-Light Slim Line.
- Optima.
- Sho me.
Each of these manufacturers produces xenon, as they say, in an assortment - with various lamps and modifications of ignition units.
Installation procedure
Next - a little about how to connect xenon with your own hands.
Preparation
The amount of preparatory work depends on the layout of the vehicle. Sometimes it is possible to get to the fog lamps only with the front bumper removed. But the most important thing is to successfully place the ignition blocks. In this case, it is desirable to reduce the length of the wires from them to the headlights as much as possible. It should be taken into account that by unnecessarily “hiding” blocks, you will thereby limit access to them. This will make troubleshooting difficult.
To connect the wires to the lamps, you will most likely have to drill holes in the headlight covers that cover the hatches. The connection kit contains special rubber seals and the drill should be selected in accordance with their size. In cases where the headlight caps are made of rubber, it is enough to make holes in them.
The choice of method for attaching the ignition units is not of fundamental importance. They can be fixed to the body parts using the brackets included in the kit or simply by gluing them to double-sided tape.
Connection diagram options
The easiest way to connect an HID lamp looks like this.
The principle of operation is simple: when the light switch is turned on, voltage is supplied to the ignition unit, a high voltage is generated in it, which is supplied to the electrodes of the gas-discharge lamp. It is impossible to mix up positive and negative wires when connecting - their connectors are incompatible with each other.
Due to the fact that the voltage of the on-board network can be significantly “drained” at the moment of ignition of the arc, it is preferable to connect xenon through a relay.
As you can see, it’s also nothing complicated. The winding of a conventional light relay (contacts 85 and 86) is supplied with voltage, which in the standard circuit was supplied to the halogen contacts. As a result, contacts 87 and 30 of the relay are closed, which are used as a switch “embedded” in the positive wire coming directly from the battery. This eliminates voltage losses supplied to the ignition unit and makes it easier to “start” the xenon lamp - the circuit becomes practically autonomous. This method is ideal not only for connecting xenon to fog lights, but also for converting the main headlights.
With bi-xenon the situation is somewhat more complicated. The simplest option to improve the operation of switching lamps when changing the “far/close” modes is to install a diode between the “positive” terminals, which prevents the control electromagnet from “sticking”.
Complete wiring diagram for bi-xenon H4.
Although HID lamps have significant advantages over halogen lamps, you should consider the possible adverse consequences of installing them yourself:
- The design of some headlights makes it impossible to correctly adjust the light beam with non-original lamps. Therefore, “collective farm” xenon often blinds other drivers.
- Making changes to the design of headlights is prohibited by the Rules.
If you modify your fog lights yourself, you will not have such problems. Setting them up correctly will significantly improve visibility during fog.
Sources: avtozam.com, tolkavto.ru.
Also read: Details about xenon and connection